Showing posts with label Flourishes. Show all posts

Friday, June 16, 2017

Vase of Blue Flowers

The sun may be shining at the moment but apparently we are supposed to have another round of thunderstorms this afternoon.  I just hope it holds off until I get home from the Taylored Expressions Studio Anniversary Party.  It's been two years now that she opened the studio and I take a class whenever I get the chance to do so.  Tonight's treasure is the cupcake stamp and die combo that I'll come home with for attending the event.  It should be a lot of fun!


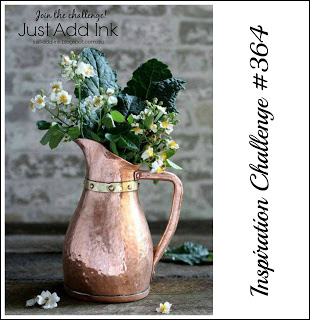
The inspiration for my design came from the Just Add Ink Challenge.  The inspiration photo was so pretty and I loved the copper vase.  To give my vase (Pitcher Vase Dies by Taylored Expressions) a coppery look, I covered the die-cut with VersaMark then used Copper Embossing Powder.  The center of the vase was done using Faded Jeans Oxide Ink on the cut out center of the vase to give it the look of water.  I layered the vase, flowers (Bloomers 4 Dies by Taylored Expressions) and greenery (Leafy Branches by Taylored Expressions) on a die cut made using the Sunburst Thinlits Die from Stampin' Up!  The sentiment is from the retired Botanical Bookplates stamp set by Flourishes and stamped using Dapper Denim ink by Stampin' Up!  For the finishing touch, I added the little die cut center and put a drop of White Blizzard Glitter Drops by Nuvo in the center of each flower.

For all the challenge details and to share your project, click the image below.


http://just-add-ink.blogspot.com/2017/06/just-add-ink-364inspiration.html

So glad you stopped by the Coffee Pot Stamping Cafe,

Marsha

Tuesday, October 8, 2013

It's Time To Vote!

Hello everyone.  It's time for you to vote for your People's Choice Guest Designer over at Flourishes.  They had a contest for their December Guest Designer spots and I decided to play along.  Now it's your turn to help that dream come true.  Click the link above or the image below to go to the voting booth!  You have until October 14th at 11:59pm CST to cast your vote.

Here is the card I submitted for the contest.


Until next time. . .happy creating!

Saturday, October 5, 2013

Christmas with a Twist

It's Flourishes October Release Challenge and I can't wait to see what new Christmas themed stamp sets they will have for us.  So, the challenge was to create a Christmas design without using traditional Christmas colors thus, the Christmas with a Twist.  Okay, no red, no green; not a problem.  Since blue is my favorite, of course it was the first color that came to my mind.

Rather than add a sentiment to the front of the card, I put it on the inside.  I kept the design clean and simple and let the beautiful image be the focal point.  Flourishes Christmas Candles Stamp Set is another favorite.  It's the one I'm using for all the cards I'll be making and sending to family and friends this year.


Stamp Set:  Flourishes Christmas Candles; Ink:  Stampin' Up! Night of Navy; Card Stock:  Flourishes Classic White, Stampin' Up! Night of Navy, Bo Bunny Powder Mountain Collection; Accessories & Tools:  Spellbinders Tear Drop Circles Die, 1/4" White Grosgrain Ribbon, Clear Rhinestones

If you would like to join in for a chance to win the whole October Release, click the image below for all the specifics.  I can't wait to see the new stamp sets!


Until next time...happy creating!

Wednesday, October 2, 2013

Marsha's Garden Fairy

It's another Timeless Tuesday Challenge and this one was so much fun!  One of the requirements was to do some paper piecing, not to be confused with paper piercing, two very different techniques.  What's more, those who enter have a chance to become a Guest Designer for Flourishes.  Now that would be beyond exciting!  All you have to do is follow the challenge specifics to be considered.

For my card, I used one of the images from the Garden Fairies stamp set.  The main image was stamped on Classic White card stock using Tuxedo Black ink.  I used colored pencils for the grass and flower stem.  Each segment I paper pieced used a different patterned paper for the flower, the dress, the wings and the butterfly.  The image didn't stamp well on the silver glitter paper, so I used a black colored pencil to show the detail in her wings as well as on the butterfly.


I added the sentiment to the inside of the card because I wanted the image to be the focal point of the card.


Stamp Set:  Garden Fairies;  Ink:  Tuxedo Black (Memento); Card Stock:  Classic White (Flourishes), Silver & Gold Collection (Bo Bunny), Vintage Christmas (My Mind's Eye), Silver Glitzy Glitter (DCWV); Accessories & Tools:  White Organdy Ribbon, Silver Rhinestones, Standard Circles Dies (Spellbinder), 1-3/4" Circle Punch (Stampin' Up!), Pop Dots, Glue Dots, Big Shot Die-Cutting Machine

If you want to more details about the challenge and special contest, click the image below.  There is still time for you to join in the challenge.


This stamp set is one of my favorites.  I loved reading about fairies and fairy tales when I was a girl.  And, yes, I still believe in fairy tales!

Until next time...happy creating!

Wednesday, September 25, 2013

Pinwheel & Polka Dots

The Timeless Tuesday Challenge - Build It With Dots over at Flourishes was not only interesting and fun, it was also something I have never done before.  It's a technique called Pointillism.  To learn more about it head over to the Flourishes blog where you'll find a few links that will explain the process to you.

Since I had not done this technique before, I decided to go with a smaller image.  The pinwheel from Flourishes Pinwheels and Popsicles Stamp Set was perfect.  Now that I've actually done this technique, I can say I will be using it again.  It gives a great look to your finished image.


Stamp Set:  Pinwheels and Popsicles (Flourishes); Ink:  Tuxedo Black (Memento); Card Stock:  Classic White (Flourishes), She Art (Christy Tomlinson), Happy Harvest (Doodlebug Design); Accessories & Tools:  Pinwheels and Popsicles Silhouette Cut File (Flourishes), Rhinestones, Pop Dots

It's a very clean and simple design but I love how the yellow polka dot paper makes the pinwheel pop!

Be sure to click on the image below to visit the Timeless Tuesday Challenge and check out the Pointillism technique.


Until next time. . .happy creating!

Saturday, September 21, 2013

Moonlight in the Trees

The other day I picked up a new embossing folder that I knew would work well with Core'dinations card stock.  It's called Birch Trees and it's from Tim Holtz.  I used it to play along with this week's Flourishes Timeless Tuesday Challenge - Let it Shine.  The challenge was to incorporate a light source in the card.

After embossing and sanding, I punched a hole in the card front and set the golden moon with a pop dot on the inside of the card.  The sanding looks like moonlight bouncing off the birch trees.  I love that sentiment from the Botanical Bookplates stamp set.


Stamp Set:  Botanical Bookplates Vol. 1 (Flourishes); Ink:  Cajun Craze (Stampin' Up!); Card Stock:  Cajun Craze, Very Vanilla and Early Espresso Core'dinations (Stampin' Up!), Burlap Paper (DCWV); Accessories & Tools:  Modern Label Punch and 1" Circle Punch (Stampin' Up!), Standard Circles Nestabilities (Spellbinders), Tim Holtz Alterations Birch Trees Texture Fades Embossing Folder (Sizzix), Clear Rhinestones (Hampton Art), Big Shot Die Cutting Machine (Sizzix), Pop Dots

Click on the image below to head over to the Flourishes blog and see some of the other beautiful designs that have been submitted.


Until next time. . .happy creating!

Monday, September 16, 2013

Festive Friday Navy, White and Silver Color Challenge

When it comes to blue, I'll follow anywhere...well almost.  I love blue.  When I saw that Festive Friday was having a Navy, White and Silver Color Challenge, I knew I had to play along.  It's been a while since I last used my Snowflake die so it was fun to pull it out and make a double layered snowflake out of blue and silver glitter paper.  It's the kind of glitter paper that does not shed!  It makes using your dies so much easier.


For the inside of the card, I added a bit of color.  I originally planned to stamp the candles in blue and just leave them as an outline but just couldn't resist getting out those Copics.


I added a strip of the silver glitter paper to the bottom of the inside layer and I added Silver Sparkle Dazzling Details and Dazzling Details to two of the candles to give them a wee bit of a sparkle.  There is still plenty of room to write a little note if you choose to do so.


Stamp Sets:  Christmas Candles and Cowboy Christmas (Flourishes); Inks:  Night of Navy (Stampin' Up!), Tuxedo Black (Memento); Copics:  Y11, YR07, R22, R24, R27, YG11, YG13, YG17, E33, E37; Card Stock:  Night of Navy (Stampin' Up!), Classic White (Flourishes), Powder Mountain (Bo Bunny), Glitzy Glitter (DCWV); Accessories & Tools:  Snow Flurry Bigz Die (Stampin' Up!), Snowflake Brad, Dazzling Details and Silver Sparkle Dazzling Details (Stampin' Up!), Pop Dots, Big Shot Die-Cutting Machine

Be sure to check out the Festive Friday Color Challenge.  Click on the image below and it will take you right to all the details.


I love the colors and really enjoyed making some snowflakes.  Now that the 90 and 100 degree temperatures have gone and it is only 74 degrees, it is a gentle reminder that cooler weather is fast approaching.

Until next time. . .happy creating!

Saturday, September 14, 2013

Tag It!

The other day I found a recipe for Homemade Seasoned Salt and thought it would make a great Christmas gift for my family and friends this year.  I can use all organic ingredients and I know that will make them very happy.  Now I'm on the lookout for some pretty jars to fill.  I also need tags for each jar so I've been playing around to see how I want to make them.  The following tag is my first endeavor.  I like it but I know I want to use Christmas colors and stamp sets for the gift tags.  I'm thinking green, red and white.  I think the sentiment I used from Flourishes Italian Garden set works well for the tags.  Anyway, here is my tag.


Stamp Set:  Italian Garden (Flourishes), Everything Eleanor (Stampin' Up!), Flowers (Autumn Leaves); Inks:  Tim Holtz Distress Inks - Vintage Photo, Frayed Burlap, Fired Brick (Ranger); Card Stock:  Inkssentials Manilla Tag (Ranger), Feels Like Home Paper (Little Yellow Bicycle); Accessories & Tools:  Tim Holtz Gem Clip, Key, 1/8" Vanilla Ribbon, Silver Eyelet, Crop-A-Dile

The back of the tag is covered with the same paper used to make the banner.  I just couldn't leave the back unfinished.

Until next time. . .happy creating!

Wednesday, September 11, 2013

A Christmas Candle and Snowflakes

Today was just like Christmas for me.  When I get home from work, I always run up and grab my mail.  I had a package from Flourishes full of goodies that I won when my card was selected in a recent Designer Focus.  What I wasn't expecting were two new stamp sets among the goodies, Christmas Candles and Italian Garden.  I just had to use one for the current Timeless Tuesday Challenge.  The challenge was to incorporate dry embossing somewhere on your project.  Click on the image below to check out the all the details for the current challenge.


And here is the card I made for the challenge.  I used one of my favorite Tim Holtz embossing folders, Snow Flurries.  The snowflakes are so pretty and realistic.  Rather than add a sentiment to the front, I decided to put it on the inside of the card.


Stamp Set:  Christmas Candles (Flourishes); Ink:  Cherry Cobbler (Stampin' Up!); Card Stock:  Classic White (Flourishes), Cherry Cobbler (Stampin' Up!), Vintage Christmas Designer Paper (My Mind's Eye); Accessories & Tools:  Tim Holtz Snow Flurries Embossing Folder (Sizzix), 3/8" White Organza Ribbon, Rhinestones, Big Shot Die-Cutting Machine

There you have it.  Tomorrow I'll have another of the Graphic 45 cards I made in class the other night.

Until next time. . .happy creating!

Sunday, September 8, 2013

Get in Shape - September Release Challenge

Flourishes is gearing up for another release and this month's release challenge is to create a Shaped Card or 3D Item.  To play along, click the image below to go right to the Flourishes blog for all of the details.


I love making non-traditional cards so I brought out Pumpkin JackThanksgiving is an often forgotten holiday but it and Christmas are my two favorites.  I remember all of the delicious smells coming from the kitchen and the beautiful table my mother used to set the those holidays.  The house was always full and it was a time to be thankful for all we had.  Here is the simple Thanksgiving card I made for this challenge.


Stamp Sets: Anemones (Flourishes), Thanksgiving Sentiments (Unknown); Inks:  Tuxedo Black (Memento), Tim Holtz Vintage Photo (Ranger); Card Stock:  Pumpkin Pie and Always Artichoke (Stampin' Up!), Classic White (Flourishes); Accessories & Tools:  Anemones Silhouette Cut File, Essentials Paper Piercing Pack (Stampin' Up!), 3/8" Lime Ribbon, Tim Holtz Pumpkin Jack Die (Sizzix), Big Shot Die-Cutting Machine

Until next time. . .happy creating!

Saturday, September 7, 2013

Ribboned Happy Birthday

Today found me up at the early hour of 4 a.m.  Considering I didn't get to bed until after midnight, that just wasn't enough sleep.  Since I couldn't get back to sleep, I got up and made a card.  Isn't that what you do when you can't sleep?

There were several challenges this week that I wanted to participate in and it worked out that this card fit the bill for them.  I love how that works out sometimes.  I'm going to keep this short as I have a few photos to add to the post.  First, is the Timeless Tuesday Double The Ribbon Challenge over at Flourishes.  The challenge was to use two kinds of ribbon.  I used a wide ribbon and a narrow ribbon.  Here's how I used them.


Stamp Sets:  Delightful Dozen and God's Blessings (Stampin' Up!); Inks:  Night of Navy (Stampin' Up!); Card Stock:  Not Quite Navy, Pool Party and Whisper White (Stampin' Up!), ADORBS Patterned Paper (My Mind's Eye); Accessories & Tools:  Small Octagons Nestabilities (Spellbinders), 1-1/4" Not Quite Navy Striped Grosgrain Ribbon and Corner Rounder Punch (Stampin' Up!), 1/8" Vanilla Ribbon (Offray), Big Shot Die-Cutting Machine

Taylored Expressions is turning five this week, so I've been playing along with all of the fun challenges and games they've been doing.  This one was to play Tic Tac Toe which is why you see , rhinestones, happy birthday and ribbon.  I'll be posting this to the Splitcoaststampers GalleryClick on the image below to head over to the Taylored Expressions blog and see all that's happening to celebrate their birthday.


A relatively new challenge for me is the one at Seize the Birthday.  All you do is make and post a birthday card.  Since I always seem to need birthday cards, this gives me the opportunity to stay on top of those cards I need to make and send.  Click on the image below to head over and see all the great projects.


Here is the wonderful sketch I used for my card.  Click on the image below to head over to the Freshly Made Sketches blog.  I love the clean and simple look of their sketches.  This, too, is new to me.


Whew!  A much longer post than normal but it was such fun to find all of these great challenges.  Now I'm off to find a new challenge to join.

Until next time. . .happy creating!

Wednesday, September 4, 2013

CASEing Allison

It's CASE time again at Flourishes.  While I didn't have all of the cool things Ally used in her card, I improvised with those that I had.  The colors and basic layout are all from Ally's project but I did change the orientation of the card since I used the Anemones stamp set and it is a tall one.  To see more of her beautiful designs, click HERE and head over to the Flourishes blog.


Stamp Set:  Anemones (Flourishes); Ink:  Tuxedo Black (Memento); Copic:  Y11, Y13, Y15, Y17, Y19, YG11, YG13, YG17, E37; Card Stock:  Classic White (Flourishes), Signature Collection Gingham (Creative Imaginations); Accessories & Tools:  Anemones Silhouette Cut File (Flourishes), Corner Rounder Punch, Eyelet Border Punch, Scallop Oval Punch and Snowburst Embossing Folder (Stampin' Up!), Rhinestones,  Stampin' Dimensionals (Stampin' Up!)

Now here is Ally's card that was my inspiration.  I love her strawberries.


Now I'm off to finish up some more challenge projects.  I love participating in challenges as they keep me creating and provide such wonderful inspiration.

Until next time. . .happy creating!

Wednesday, August 28, 2013

Sweet Treats

The weather here has been scorching!  In the high 90s or low 100s and even with a breeze, there is no cool to it.  When it's this hot, I love a nice cold dish of ice cream.  Since I didn't have any, the next best thing was to bring out my Flourishes Pinwheels and Popsicles Stamp Set and make some cool treats.  Have I told you how much I love my Silhouette SD?  The popsicle and ice cream cone are both cut outs from cut files that match the stamp set.  I even used pink!  Now how about that!


Stamp Sets:  Pinwheels and Popsicles (Flourishes), Teeny Tiny Wishes (Stampin' Up!); Ink:  Melon Mambo (Stampin' Up!); Copics:  E33, E37, E39, V12,V15, V17, R22, R24, R27, YG11, YG13; Card Stock:  Classic White (Flourishes), Blushing Bride (Stampin' Up!), Here & Now Patterned Paper (Echo Park); Accessories & Tools:  Pinwheels and Popsicles Silhouette Cut File, Word Punch, Modern Label Punch, Dazzling Details and Stampin' Dimensionals (Stampin' Up!), Pink & White Twine.

Clean, simple and fun to make.  My son and his family are staying with me this week as they are moving.  Devin, Mariah and Aiden were all helping me pick out colors for the popsicle and ice cream.  Mariah thought a grape popsicle would look good with the polka dots.  Devin chose the green and brown for the ice cream because he likes mint and chocolate chips.  Aiden helped shake the table while Grandma tried to color.  We had a great time.  Tomorrow we are making bottle cap necklaces for each of them.  It is something we can do together and have some fun.  They love to make stuff with me.

Until next time . . . happy creating!

Tuesday, August 27, 2013

Timeless Tuesday #235 - In Distress

Wow!  I can't believe I got my card for the Timeless Tuesday Challenge done today, Tuesday!  Lately, it's been down to the last day.  It could have been because the minute I saw that we had to distress a card, I knew what I wanted to do immediately.  Now that doesn't happen every day.  Click HERE to go right to the Timeless Tuesday #235 - In Distress Challenge.

Graphic 45's patterned paper is perfect for that distressed look.  Today I used Secret Garden.  All but the card base are from the Secret Garden collection.  I didn't put a sentiment on the front of the card because I love what is on the cut out.  However, I did add it to the inside of the card and both are from a couple of my Flourishes stamp sets.


Stamp Sets:  Anemones and Swan Lake (Flourishes); Inks:  Tim Holtz Distress Ink Vintage Photo (Ranger), Soft Suede (Stampin' Up!); Card Stock:  Soft Suede and Very Vanilla (Stampin' Up!), Secret Garden Patterned Paper (Graphic 45); Accessories & Tools:  Pearl Basic Jewels, Stampin' Dimensionals and Stampin' Distress Tool (Stampin' Up!), Cream Twine distressed with Vintage Photo ink

This was such a fun challenge given the fact that I love the distressed look.  I don't do it nearly as much as I would like.

Until next time . . . happy creating!

CASEing Tosha

Here is another card I made to send to my sister.  I have decided to go ahead and make a card for each month remaining in the year, get them all addressed, stamped and ready to seal once I've added a little note.  Now all I will need to do is add that little note, seal it and drop it in the mail.  Now that I think about it, I really should do that for all those I want to send cards to.  Looks like I'll have to design a 'send a card' file just to keep them all.

Today I'm joining in on the Designer Focus over at Flourishes.  This time they are showcasing Tosha Leyendekker.  Click on her name to see all of the beautiful things she has designed.  All we have to do is CASE one of her designs.  To get all the details, head over to Flourishes for all the details.


Stamp Sets:  Sweet Violets, Dahlias (both from Flourishes); Ink:  Concord Crush (Stampin' Up!), Copics:  YG11, YG13, YG17, V12, V15, V17, Y19; Card Stock:  Classic White (Flourishes), River Rock and Concord Crush (Stampin' Up!), April Rose Illustration Paper Pack; Accessories & Tools:  Large Oval Punch (Stampin' Up!), white organdy ribbon, twine, button (Stampin' Up!)

Here is the card of  Tosha's that I CASEd.


The beautiful patterned paper is from the April Rose Paper Pack.  I discovered this wonderful magazine called Cardmaking & Papercraft and fell in love with it.  It's from the UK and it is full of wonderful inspiration.  Not only that, but you get a free gift with each magazine.  Last month it was a twelve piece Holly Hobby stamp set.  This month this beautiful paper pack.  Needless to say, it is now on its way to my mailbox every time an issue comes out.

Until next time . . . happy creating!

Sunday, August 25, 2013

Fairy Tale and Doily

Today I was thinking of my younger sister, Terri, who lives in Wisconsin.  It has been such a long time since I last saw her.  We keep in sporadic touch so I decided that I was going to start sending her a card a month to let her know I'm thinking of her.  She loves purple so I used a lot of purple tones on the card.

With the deadline for Timeless Tuesday at Flourishes looming, I added a doily which was the focus of the challenge.  To find out all the particulars, click HERE.  It will take you right to the Timeless Tuesday #234 - Dainty Doilies challenge.  You still have time to enter, too!

I had a lot of fun making this card.  I used the Garden Fairy stamp set I won from Flourishes as part of the July release.  It is a beautiful set and the first time I've had a chance to use it..  I also used the Silhouette SD that I won at work for an employee contest.  I am having so much fun with it, too.  I discovered that all of the stamp sets I won from Flourishes have cut files so I just had to have them.  I cut the image, stamped and colored it.  So cool to not have to fussy cut it since I'm not so good at the intricate cutting these days.  When I was coloring the image, I realized I didn't have any flesh tone Copic markers nor anything that would work for the wings of the fairy.  So, out came the colored pencils and Smooch.  I used my peach pencil for the touch of skin tone.  For the wings I used a periwinkle and covered it with Smooch to add a little shimmer.  I think my sister is going to love it!


Stamp Set:  Garden Fairies (Flourishes); Ink:  Concord Crush (Stampin' Up!); Copic Sketch Markers:  YG11, YG13, YG17, V12, V15, V17, Y11,Y13, Y15, Y17, B00, B02, B05; Accessories & Tools:  Scallop Oval Punch and Oval Punch (Stampin' Up!), Smooch Pearlized Top Coat, Bo Bunny Doily, White Organdy Ribbon, Garden Fairies Silhouette Cut File, Silhouette SD Die-Cutting Machine, Dimensionals

The doily is actually white but I sponge some Concord Crush ink on it to take the brightness away.  It was a perfect back drop for this little fairy.

Until next time . . . happy creating!

Sunday, August 18, 2013

Autumn Color for the Timeless Tuesday Challenge #233

Fall is my favorite time of the year.  When the challenge for Timeless Tuesday was all about autumn colors, I knew I had to join in and use some of the new 6x6 paper pads I recently bought.  They full of the wonderful colors of fall.  To get all the details and join in the challenge, click HERE.


Stamp Sets:  Dahlias (Flourishes), Sentiment (Unknown); Inks:  Tuxedo Black (Memento), Tangerine Tango (Stampin' Up!); Copic Markers:  Y15, Y17, Y19, E33, E37, E39, R22, R24, R27, YR02, YR07, YR09, YG11, YG13, YG17, B00, B02, B05; Accessories & Tools:  1/8" Organdy Ribbon, Bo Bunny Trinkets, Dimensionals

As you can see, I didn't add a sentiment to the front of the card but placed it on the inside.  I let the flowers speak for themselves.

Until next time . . . happy creating!  

Wednesday, August 14, 2013

Flourishes August Release Challenge

It's hard to believe that summer is almost over!  School is starting up for most and Flourishes is sharing sneak peeks of their new stamp sets for August.  For a chance to win all three of the sets being released this month, click HERE and play along with their All About Color - August Release Challenge.

I love the colors in this challenge.  I used a very dark teal and Stampin' Up!'s Cajun Craze fit the bill for the Terra Cotta color.  For the cool neutral color, I used some of the new Gingham patterned paper I just bought.  And, of course, I used my Flourishes stamp sets!


Stamp Sets:  Anemones and Garden Fairies (Flourishes); Inks:  Tuxedo Black (Memento), Cajun Craze (Stampin' Up!), Tim Holtz Antique Linen Distress Ink (Ranger); Copic Markers:  YR02, YRO7, YR09, YG11,YG13, YG17; Card Stock:  Dark Teal (Unknown), Cajun Craze (Stampin' Up!), Gingham (Creative Imaginations); Accessories & Tools:  White organza ribbon, Pearl Basic Jewels (Stampin' Up!), Butterfly Die Cut (Silhouette SD)

I love fall colors!  Autumn is my favorite time of the year.  While I'm not looking forward to cold and snow, seeing the beautiful colors of Autumn always fascinates me.

Until next time . . . happy creating!
Tuesday, August 13, 2013

An Experiment with Water and Ink

Well, sometimes things work out and sometimes they don't.  I was playing with water and ink the other day trying to see what would happen when you drizzled each on an acrylic block and stamped the paper with it.  I like the way it looks but I think it needs to be a bit bolder so the colors are more defined.  I'm definitely going to give this another try but with more color.  I just didn't add as much ink to the water as was needed.  So, it's back to the drawing board.


Stamp Set:  Dahlias (Flourishes); Inks:  Pear Pizzazz and Island Indigo (Stampin' Up!); Card Stock:  Classic White (Flourishes); Accessories & Tools:  Lime and white twine, clear button, dimensionals

Until  next time . . . happy creating!

Wednesday, August 7, 2013

Butterfly Hello

When I saw this sketch over at The Sweet Stop, I knew it would be perfect for this little buckle I found while going through some of my sewing supplies.  Just click on the image to go over to The Sweet Stop to see all the details about the sketch challenge.

  
Here is the card using the buckle with some pretty ribbon threaded through it.  Although it is hard to see in the photo, there are butterfly outlines all over the light colored paper.


Stamp Set:  Dahlias (Flourishes); Ink:  Elegant Eggplant Marker (Stampin' Up!); Card Stock:  Elegant Eggplant (Stampin' Up!), Vintage Bliss (Simple Stories); Accessories and Tools:  Butterfly Punch (Stampin' Up!), 5/8" Grosgrain Ribbon, Belt Buckle, Tim Holtz Tiny Attacher Stapler

Until next time. . . happy creating!